Well, You have modeled nice a character, textured it with love, you have even built a small map for him, and if you've read the basics of this tutorial, you should know how to add a script and launch your "game." Now, it's time to get into the heart of the matter: move your character!
Theoretically, you should already have a starting scene with only an object and a functional script bound to it.
Move our character[]
Prepare the scene[]
First of all, we will prepare our game scene:
- Open your scene.
- In the existing object (which currently only contains a script component) add a new model renderer component and bind your character model to it.
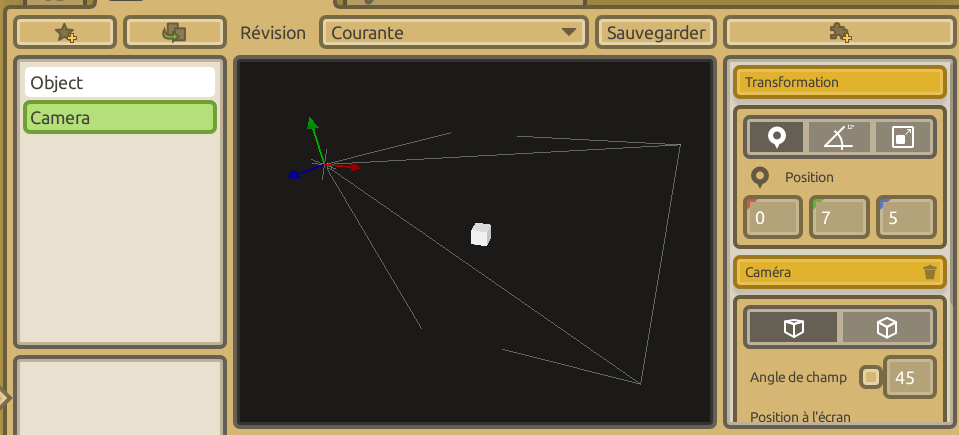
- Add a new object in the scene (independent of the first), rename it "Camera" (or something similar) and add a camera component to it.
- Move your camera to a position slightly above your character so you can see when he moves. It's currently not possible to preview the rendering camera, so if you do not really know what you are doing, simply try to get something like this:
Your scene with an object and a camera
Start your scene, make sure your object appears on the screen and your script runs without errors.
Move forward[]
Firstly, we will simply move our object with the Move() command from the transform component . The transform component allow the same thing as the transform component associated to each object, but within the script. All methods from it are described in the transform section of the scripting reference .
We can see that there are several ways to move our object: Move(), MoveLocal() and MoveOriented(). The difference between those methods lies in the axis reference against which our object will move:
Move(): Movement are relative to the scene
MoveLocal(): Movement relative to the object's parent (ie in relative to the scene if the object has no parent)
MoveOriented(): Movement relative to its own reference.
In our case, we use the most obvious: "Move()." Its definition is:
Transform:Move( [Vector3] offset )
It means that it applies to a transform component and it takes a Vector3 object as a parameter (offset) . It represents the amplitude of our movement.
This is a good time to see the Vector3 reference . A Vector3, as its name suggests, is a vector in three dimensions. It's simply a mathematical tool that we used to store a position, or a movement, defined by three coordinates. In our case, we simply want our object moving along the x axis. We therefore use the vector defined by: Vector3: New (0.01, 0, 0)
We also have to retrieve the Transform component of our object. There are several ways to do that, but in our case, the easiest way is to use: self.gameObject.transform: self represents the running script, self.gameObject represents the object containing this script and therefore self.gameObject.transform represents the transform component associated to the object which is bound to our script!
So, in Behavior:Update() we will have:
self.gameObject.transform:Move( Vector3:New( 0.01, 0, 0 ) )
Run your game, you should see your object moving to the right.
That's fine, but we do not want our object to move continuously. Therefore, we will condition the movement to an input.
Every method used to recognize actions performed by the user are attached to the object CraftStudio.Input and are described here: Scripting Reference / CraftStudio.Input
The "Input" can be : axes, buttons or mouse. For the object's movement we will use axes. In the project's options, there should already have two axes: "Horizontal" and "Vertical" related to keys w, a, s and d.
To know if the user wants to go to the right we use: CraftStudio.Input.GetAxisValue ("Horizontal")
This function returns 1 if "D" is pressed, -1 for "A" and 0 for neither.
You can insert print(CraftStudio.Input.GetAxisValue ("Horizontal")) in Behavior:Update() to test.
In general, try to test your code at every step using the print() command. Just remenber to remove the test lines to lighten down your code and the debug console.
Our final script becomes:
function Behavior:Update()
   if CraftStudio.Input.GetAxisValue( "Horizontal" ) == 1 then
       self.gameObject.transform:Move( Vector3:New( 0.01, 0, 0 ) )
   end
end
Test it. Now our object should move to the right when you press "D".
The other directions[]
Now we want our object to go left, up and down when we press w, a and s.
Try to complete the script yourself with what you have learned.
After some trial and error, you should get something like this:
function Behavior:Update()
   if CraftStudio.Input.GetAxisValue( "Horizontal" ) == 1 then
       self.gameObject.transform:Move( Vector3:New( 0.01, 0, 0 ) )
   end
   if CraftStudio.Input.GetAxisValue( "Horizontal" ) == -1 then
       self.gameObject.transform:Move( Vector3:New( -0.01, 0, 0 ) )
   end
   if CraftStudio.Input.GetAxisValue( "Vertical" ) == 1 then
       self.gameObject.transform:Move( Vector3:New( 0, 0, -0.01 ) )
   end
   if CraftStudio.Input.GetAxisValue( "Vertical" ) == -1 then
       self.gameObject.transform:Move( Vector3:New( 0, 0, 0.01 ) )
   end
end
This is a good starting point, but you may want to move a little faster. You can replace every 0.01, by hand, with a higher value, but it would be a bit tedious. Instead, we'll create a variable that will store the velocity of the object.
There are several types of variables: Global, Local or Public. (If needed, you visit this link and read the variable scope part to understand the difference)
We can use either three, but I strongly recommend to avoid using global variables! (this is not the purpose of this tutorial to explain why).
In our case, it's best to use a public variable (self.MyVariable). Once declared in the initialization script (Behavior: Awake()) by:
self.speed = 0.05
It can be used and modified everywhere in the same script. We can therefore replace all "0.01" by "self.speed" .
To improve the readability of our code, we will also store input values in variables, local this time, so they will be recreated each time through the Update(). We obtain:
function Behavior:Awake()

   self.speed = 0.05

end

function Behavior:Update()

   local horizontal = CraftStudio.Input.GetAxisValue( "Horizontal" )
   local vertical = CraftStudio.Input.GetAxisValue( "Vertical" )


   if horizontal == 1 then
       self.gameObject.transform:Move( Vector3:New( self.speed , 0, 0 ) )
   end
   if horizontal == -1 then
       self.gameObject.transform:Move( Vector3:New( -self.speed , 0, 0 ) )
   end
   if vertical == 1 then
       self.gameObject.transform:Move( Vector3:New( 0, 0, -self.speed ) )
   end
   if vertical == -1 then
       self.gameObject.transform:Move( Vector3:New( 0, 0, self.speed ) )
   end

end
We can still simplify our code creating a vector to store the input value, it will instantly become the movement vector:
local movement = Vector3:New( horizontal, 0, -vertical )
For exemple, this vector will be (1,0,1) if we want to move to the lower left.
We just a to handle the speed by multiplying our movement vector:
movement = movement * self.speed
Then use this vector in the Move() method :
self.gameObject.transform:Move(movement)
Final scriptEdit[]
function Behavior:Awake()

   self.speed = 0.05

end

function Behavior:Update()

   local horizontal = CraftStudio.Input.GetAxisValue( "Horizontal" )
   local vertical = CraftStudio.Input.GetAxisValue( "Vertical" )

   local movement = Vector3:New( horizontal, 0, -vertical )
   movement = movement * self.speed

   self.gameObject.transform:Move(movement)

end